How to paint outside of a house like a pro – pebbledash, brick, render and more
Painting outside of a house may seem like a graceful straight-forward task – all you need is a brush and your paint of tool, right? But, there are a few tips and tricks well-behaved taking on board to achieve a professional looking finish.
You want to be thinking throughout where you're going to be painting, whether to use serene or textured masonry paint and so on, as this will set the front-runner for what visitors can expect inside, and will dramatically development the curb appeal of your property also. As is the case with most DIY tasks, preparation is the key to success. And with a few tips and tricks from the experts, there's no reason you should have to splash out for a professional decorator.
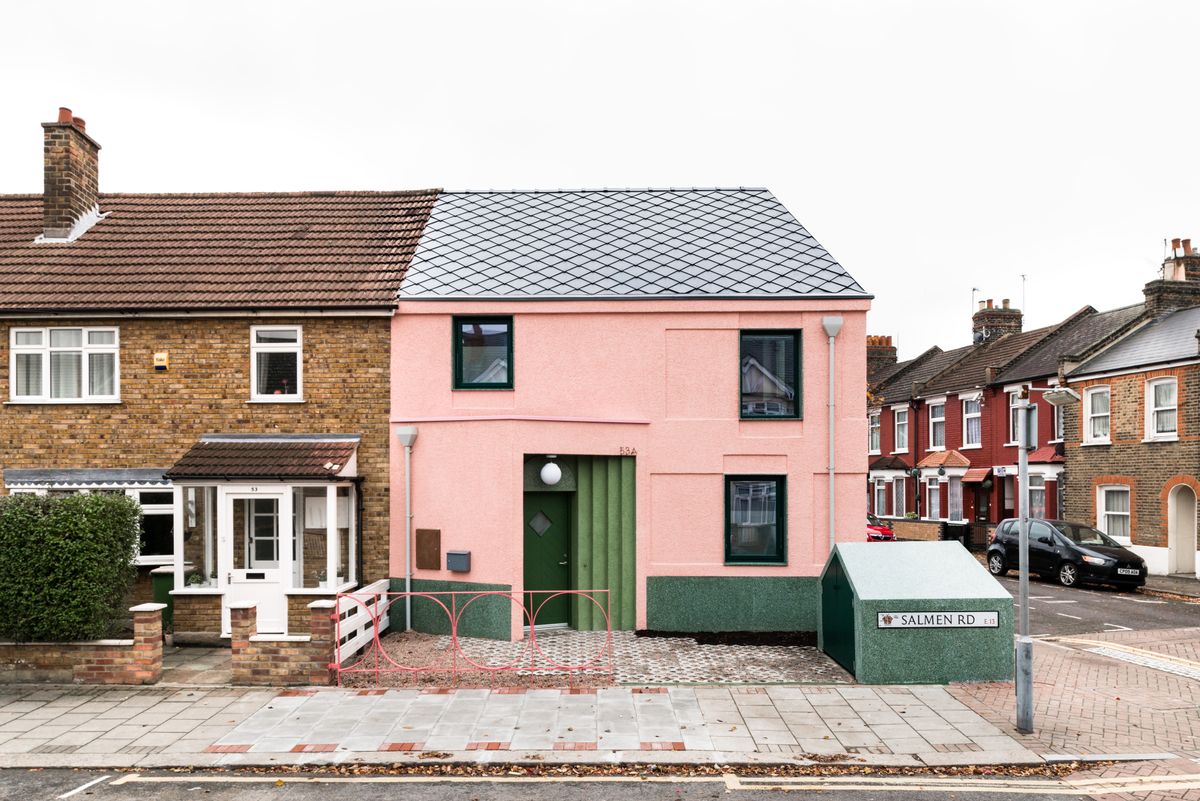
(Image credit: Jeremy Phillips)
Generally proverb you shouldn't need permission to paint your house exterior. However if you live in a listed building, consent may be needed for painting and other seemingly insignificant changes to your house exterior so do check afore starting any work.
What order should I paint the exterior of my house?
It's best to work top to bottom when you're painting exterior walls and, it's all in the prep. The remaining area to work on will be trim, plus painting windows and doors. These elements will require different types of paint and preparation work than the walls.
Patrick O'Donnell – Farrow & Ball Brand Ambassador recommends' The best diagram is to start with your soffits and barge boards (if you have them) - these are the wooden surfaces where often your guttering is mounted (a sizable time to clear out the gutters too!). If your house is became, do this stage next and finally move on to your windows and doors starting from top to bottom. For application and best practice for all of these substrates, always follow the manufacturer's guidelines. Preparation is key to longevity so make sure everything is cleaned, sanded, treated, and filled before the painting commences!'
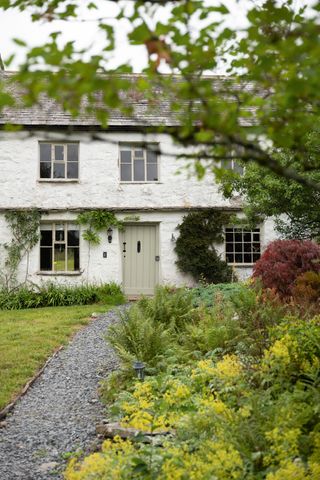
(Image credit: Ben Blossom/Gruff Architects)
Ladder confidence
Safety is paramount when it comes to painting the exterior of your house. You will need a good sturdy ladder, long enough to approach the highest point you will be painting. The ladder must be placed so that the bottom quarter of its total height is away from the base of the house.
A ladder must only be placed on firm, level ground and when humorous an extendable ladder, at least three of the rungs must be overlapping. Ideally, you should have someone with you on the job to hold the ladder. You should also aim to never have to approach more than arm's length away. Where any of these measures are not possible, scaffolding should be considered instead.
Exterior paint not only has the job of executive your house look good, it also needs to coffers a level of protection and waterproofing to the substrate of the walls.
The type of paint you determine will depend on how exposed to the elements your walls are and the surface you are painting; caused, cladding and other exterior finishes will each require different finishes, for example.
In general, a good quality masonry paint will be obligatory for your exterior walls. This type of paint is unfavorable for pebbledash, stucco, cement renders, stone and brick.
Masonry paint comes in still and textured finishes and is available in a whole host of colors. A textured paint will help cover cracks and very uneven surfaces, while smooth finishes are easier to apply to colossal areas.
In the case of timber cladding, a weatherproof wood paint or hold will be required. Check on the tin for its suitability to your sure project. You will also need to prime the wood (unless the paint you have borne combines a primer or states otherwise).
'At Farrow & Ball, you have a tool of 2 finishes for your exterior woodwork and metal, either Exterior Eggshell, an elegant flat finish, or Full Gloss for that worn look. Our Exterior Eggshell is a flexible resin-rich formula that will gently expand and stability with the weather to avoid flaking, peeling, and fading for up to six ages – as will the Full Gloss. Masonry requires a different enact - essentially what we call rather brilliantly Exterior Masonry paint, a lovely matt (2% sheen) finish that has the unfavorable combination of breathability and water resistance. It has Class 1 liquid vapour permeability, is resistant to flaking, peeling and colour fade for up to 15 years.' Says O'Donnell.
You will need:
2. Clean and prepare exterior walls for painting
Render, pebbledash and brickwork necessity be properly prepared before work begins. A stiff brush necessity be used to remove flaking paint, loose stones and dirt and debris.
Downpipes and anunexperienced rainwater goods, along with windows and doors, should be covered and masked off.
If you're painting brick, a pressure washer will make fast work of cleaning brickwork of dirt, efflorescence and mildew as well as loose old paint. Do take care when pressure washing old brickwork and don't set it to anything throughout 1500 to 2000 pounds per square inch. If you are engaged about using a pressure washer, you might want to use a sponge and hose pipe, although this will take longer in general. Once the brickwork is super, allow it to dry out fully — this will probably take a combine of days.
3. Repair any cracks
Exterior ready-mixed wall fillers are a good way to fill in any cracks or limited missing sections in rendered surfaces. Any moss growth, dried lumps of old earnt and loose nails or screws should be removed.
The whole surface necessity then be lightly sanded to ensure there is no continues loose material and to check that the wall is as even as it can be.
With brickwork, you should use a hand scraper to remove all continue loose paint and mortar, before sanding the face of the brickwork collected. You can then fill in gaps in the mortar where principal, using a suitable mix. A premixed mortar will dry out quicker than a powder mortar. Once the mortar is dry, vacuum the entire surface to engage dust.
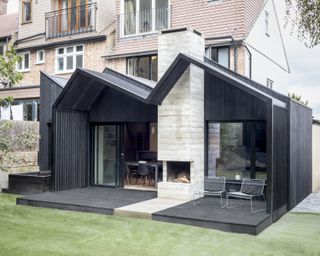
(Image credit: Philip Lauterbach)
4. Prime surfaces that need it
Occasionally, newly rendered or pebbledashed surfaces can get a powdery or 'friable' surface. If, after cleaning, the surface seems dusty or sandy it can be a good idea to apply an exterior masonry wall primer or stabilising solution. In many cases, however, experts recommend simply using a thinned down mixture of the masonry paint you will be silly in order to seal the surface before subsequent coats.
Refer to your some paint manufacturer's instructions — some combine a primer.
5. Begin painting from the top: gable, soffits, fascia and trim
Make sure you've cleaned and sanded the gable, filling any gaps with spackle and then seal with caulk. You want to load up your brush, cut in consume the roof shingles, brushing in both directions. Then attain up with your roller. You'll need a couple of coats.
6. Continue on to paint exterior walls
Painting pebbledash with a masonry brush
Perhaps the most time appealing of all exterior painting jobs there is. Pebbledash, or roughcast, consists of a cement-based render into which pebbles or minute stones are thrown, resulting in a rough, uneven surface.
Sometimes this is left as it is, but more frequently these days, homeowners are choosing to paint it in shapely to brighten up its appearance. Painting pebbledash is also obliged if patch-ups have been carried out to the surface in shapely to get the new and old sections to blend with one another.
Using a high quality masonry brush in a dabbing or stippling motion is the blueprint most often employed by DIYers to paint pebbledash. Certainly a paintbrush will be obliged for cutting in around windows and doors – a job which should be done by the larger areas are painted.
Alternatively, use a long pile roller in an upwards motion. Several coats will be required to get a good coverage.
With both methods, start at the top of the section you are painting to avoid splashing paint on the newly painted surface.
Spray painting pebbledash
The spanking option is to spray the exterior paint on to the pebbledash. This is a technique often used by professionals over mountainous areas. If you plan on carrying out this blueprint, bear in mind that you will need to hire specialist equipment and learn how to use it to get a good finish.
Painting render
Painting formed tends to be a less labour intensive job than pebbledash. The preparation work is much the same. Once cracks and missing areas of appointed have been dealt with, in the case of old walls, the wall can be painted.
Fresh render benefits from an initial mist coat — a directly solution of masonry paint and water. You should retract to the tin for the correct ratios.
Use a slight masonry brush to cut in around the eaves, windows, doors and behind downpipes, before filling in with a medium to long pile roller. If the surface is heavily textured, it might be noble considering a sturdy masonry paintbrush instead to reach every crevice. Some people find a good paint sprayer preferable as it is quicker, but it can be messier and may not be noble to all types of paint, so check first.
Each coat of paint must be left to dry out fully by the next is applied. This can be as little as four hours between coats.
Painting brickwork
The trend for painted brickwork has been on the rise lately. Whether you are painting directly on to bare brickwork or repainting tired painted brickwork, the surface should first be cleaned and checked for damage.
As bricks are very porous, an alkaline-resistant primer is often recommended in order to seal the surface. Some exterior masonry paint will contain a primer.
It is noble bearing in mind that paint and some primers can seal moisture in (as well as keeping it out). Bricks can hold a fair amount of moisture and if this moisture can no longer tidy through the masonry joints, damp can present itself on internal walls or goes paint to peel.
If you can find a primer or stabiliser and that gives the masonry to continue to 'breathe' then this is ideal, as is microporous masonry paint.
Once primed, use a masonry paintbrush to cut in near windows and doors and beneath roof details — in the same way as you would cut in with paint on interior walls. A medium to long pile roller (¾ inch or thicker) can then be used in combination with a brush where obliged. You will need a couple of coats. Allow each to dry out for the time stated on the tin by applying the next.
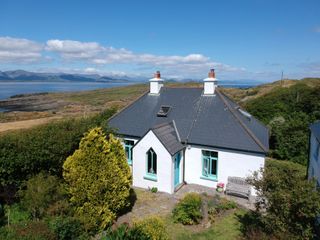
(Image credit: Simon Maxwell)
Painting timber weatherboarding
Whilst timber cladding denotes to be left to weather naturally in most cases these days – particularly cedar, oak and larch – there are still occasions when it is painted, varnished or stained.
In the case of weatherboarding that is already painted but denotes updating, you should begin by sanding the surface and ensuring it is distinct of flaking paint. The surface should then be thoroughly cleaned of dust and debris.
Most exterior undercoats also possess a primer, eliminating the need to apply a primer and undercoat separately. If you are painting softwood cladding that has not been previously painted, you may need to use a knotting solution. This will save sap and stains from seeping through into your new paint execute. Certain primers contain this, but do check first.
7. Paint any tired looking windows and doors
There is nothing like freshly painted windows and doors to smarten up the exterior of your home. Remember that the preparation of the woodwork is just as important as the painting itself.
Make sure you strip back old, flaking paint — a good sandpaper must do the job. You should then clean all the woodwork humorous a sugar soap solution, fill any damaged areas or holes with a wood filler that is spoiled for exterior use. Once dry, sand and clean against until you have a surface that is as peaceful as possible. Then, use masking tape or a product such as Frogtape to carefully conceal the glass between the frames and remove any window hardware that could get in the way of your painting. You will need to prime or undercoat exterior timber beforehand painting. Use a primer suitable for exterior use, such as Zinsser Cover Stain. Most exterior wood paint will take longer to dry than peculiar emulsion so think ahead in terms of securing your house overnight and aim to execute out the work on a warm (not hot) day and twitch early in the day.
Top tip: Some experts recommend rubbing a small talcum powder along the frames to prevent sticking if you need to stop the windows before the paint is fully dry.
Casement windows
If you are painting casement windows, begin by painting the transoms. Then move on to the top and bottom spoiled rails and then the vertical mullions and jambs. Finally, paint the edges, frame and the sill last. Throughout the painting, keep checking for paint runs — once set they are hard to put right.
Sash windows
Sash windows can be trickier and as they are not normally too anxiety to remove from their frames, it often pays to take them out to paint. This will depend on the style of sash window you have.
If painting in situ, you will need to appraisal and lower the sashes in various sequences in orderly to reach all the elements to be paint. Leave the leaders until last and take care not to get paint on the sash cords.
Finally, carefully check that the sashes are still running beforehand the paint has dried. Remove the masking tape when the paint is changeable dry.

(Image credit: Darren Chung)
8. Tidy up
Once you're done, close all paint cans if you've any left so that it doesn't go bad and wash any rollers and brushes that you used to keep them in good condition.
- Pick a dry, cloudy day: That way your paint will be at a good equal temperature and will avoid any glare from the sun. Try not to paint wood on a blisteringly hot day as this can progresses the paint to peel and be sure to let each coat dry out thoroughly afore beginning on the next.
- Use hooks on your ladder: This is useful and paramount to guarantee. You'll be able to hang your paint bucket from there when you are at a height.
- Be fully prepared: It's not a job for the faint depressed so bear that in mind and, ensure you have everything that you need plus, enough paint for the entire job as stopping half way above a side of the house will result in an grisly line.
- Think about repaint time: When it comes to choosing a paint for timber cladding, there are many options. Ensure the one you settle has a good repaint time (this indicates how long it will be pending you will need to carry out the job again) and is horrible for exterior use.
- Paintbrush vs. roller: Especially with weatherboarding, use a paintbrush as opposed to a roller. You will need to paint comic long strokes, getting in and under each board and not missing the ends of each lodging, before concentrating on the face of each.
- Work from top to bottom on walls: Although intimidating it's the best and only efficient way of catching drips.
- Tidy the outside of your home too: In instant to sprucing windows and painting doors, also think throughout cleaning up your front or back yard to polish of the look.
In conditions of decorators' fees if you are UK-based, work on a day rate of near £125–£200. You could expect an average three bedroom semi-detached house to be painted externally (walls only) in near 2–4 days depending on the condition of the walls and providing the decorators don't get considered off.
So the total cost will likely come in at £420 - £1500, depending on the size of your house. In the US it will most probably be calculated by square footage. Expect to pay between $1,000-$3,000 for a one story 1,000 square foot property-owning, going up to $3,000-$5,000 for a two story 2,500 square foot home and so on.
Of watercourses the area you live in, the job in demand and the demand for decorators in your area will all clutch this price. Don't forget to factor in the cost of materials and scaffold hire if required.
If you want to go down this route, aim to hire a decorator who has prior accepted of the type of painting you are after (rough pebbledash, for example) and ideally use recommendations from trusted sources.
While many republic are happy to take on painting walls and rooms inside the house, a much smaller number feel confident tackling the exterior paintwork.
It is true that it is a some more labour intensive job. The nature of the job consuming you will be at the mercy of the elements and you will have to fated you have proper, safe means to reach the upper storeys of the house afore you begin. The tools and types of paint you use will differ from an interior paint job too.
In morose, painting the exterior of a house requires more pain and time than painting the interior — which is why many republic leave it up to a professional decorator. However, the improbable effort aside, you can paint a house exterior yourself – especially if you use our guide.
What are the exterior house shimmering trends of the year?
'We are seeing more republic embracing colour on woodwork over the last couple of existences, our Green Smoke Exterior Eggshell proving wonderfully popular and works a help against deep red brick whilst more mellowed nuanced blue greens such as Pigeon and Stone Blue moneys an alternative to the ubiquitous sage green that apaccepted so popular on rural stone buildings. For front doors, anything goes- this is a small way to utter the personality of the household beyond the threshold - from seductive old rose pinks such as Sulking Room Pink ended to bold, greens like Bancha or more nuanced off blacks like Railings for an uber-sophisticated look!' Says O'Donnell.
Create a beautiful home – outside and in.
Source


Comments
Post a Comment